Showing posts with label One Hour Wargames. Show all posts

Friday 6 September 2024

Jacobite Rebellion - One Hour Wargames

Subsequent to this year's Plastic Warrior Show, Anthony has acquired the greater part of a Jacobite 54mm wargames collection created by our old friend Eric Kemp.  Needless to say, we couldn't wait to get them out on the table.  We turned to our default ruleset for such games, One Hour Wargames by Neil Thomas and selected Scenario 6 - Flank Attack.

This post is really a shameless opportunity to show off some very pretty toy soldiers, for which I offer no apology!

The scenario opens with the Jacobite army on the road home to Scotland, their path blocked by two units of Government troops, while another 4 units are approaching on the east flank. 

The basic rules were tweaked to reflect national/tactical differences so that Highlanders have a longer move distance and can charge but not shoot they also gain a +2 in melee, regular infantry can move or fire but not both and can't charge. 

This makes for a fast moving and very bloody game so we actually managed to play the scenario twice and this was the first game

Two units of Highlanders in the van followed by artillery and a unit of French allies (their only regular unit) approach the Government regulars.

The blocking Government troops get off a volley before they are hit by the Highlanders charge, once in melee they are unable to disengage.

The Government troops out on the flank include a unit of loyalist Lowlanders who have the same movement and combat features as the Highlanders.

The regulars and artillery on the flank advance into range and begin to pepper the attacking Highlanders.

The French regulars turn to face the threat from the flank.....

......and defend against the charging Lowlanders 

The Highlanders have the advantage in melee but need to engage quickly before they take too much punishment from the musket volleys, flexibility in changing formation proved to be the key to the game.


In the second game the Government drew a unit of cavalry, together with the artillery they blocked the path of the Highland army.

Cavalry follow the standard OHW Horse and Musket rules, they can charge but if they do not eliminate the unit attacked they are bounced back half a move.

The collection includes Jacobite cavalry in the form of Bagot's Hussars but sadly they didn't get drawn when units were diced for, I think they would have made a substantial difference to the dynamics of the game.

With the Highlanders enhanced movement both sides moved rapidly into contact and very quickly became depleted in combat, these were without doubt the fastest OHW games we have played to date.

The Government troops carried the day in both games but they were each a very close run thing.

The figures themselves include a large number of conversions, particularly among the Highlanders, makers include: Replicants, Armies in Plastic, A Call to Arms, Accurate, Barzo, Marx, Cherilea and Timpo.

Sunday 2 February 2020

One Hour Wargames in the Dark Ages

With the Christmas break a distant memory it was time to get the new gaming season off to a start, and as Anthony had recently acquired a collection of Saxon and Viking toy soldiers made by Expeditionary Force of Singapore we had to give them an airing.  Here's how it went:

We chose to play Fighting Retreat, (scenario 20) from One Hour Wargames by Neil Thomas, which sees a small Viking warband falling back while delaying a larger force of pursuing Saxons, thus allowing the main body of raiders to escape to their longships laden with the plunder.

Above, the raiders have crossed the river and their skirmishers have occupied the woods ready to surprise the Saxons who are just approaching the ford in the river.

Here the mounted raiders are putting distance between themselves and their pursuers while the slower moving footmen, realising that they risk being ridden down, have turned and formed a shieldwall.

We have used this scenario before for a medieval game (OHW link on the right should find it), but this time it played out very differently.  The thing we like best about OHW is that it uses the same basic rule structure for every historical period, but there are subtle changes to how the rules work, within each particular period, to reflect the developments in weaponry and tactical practice as military science evolved.  

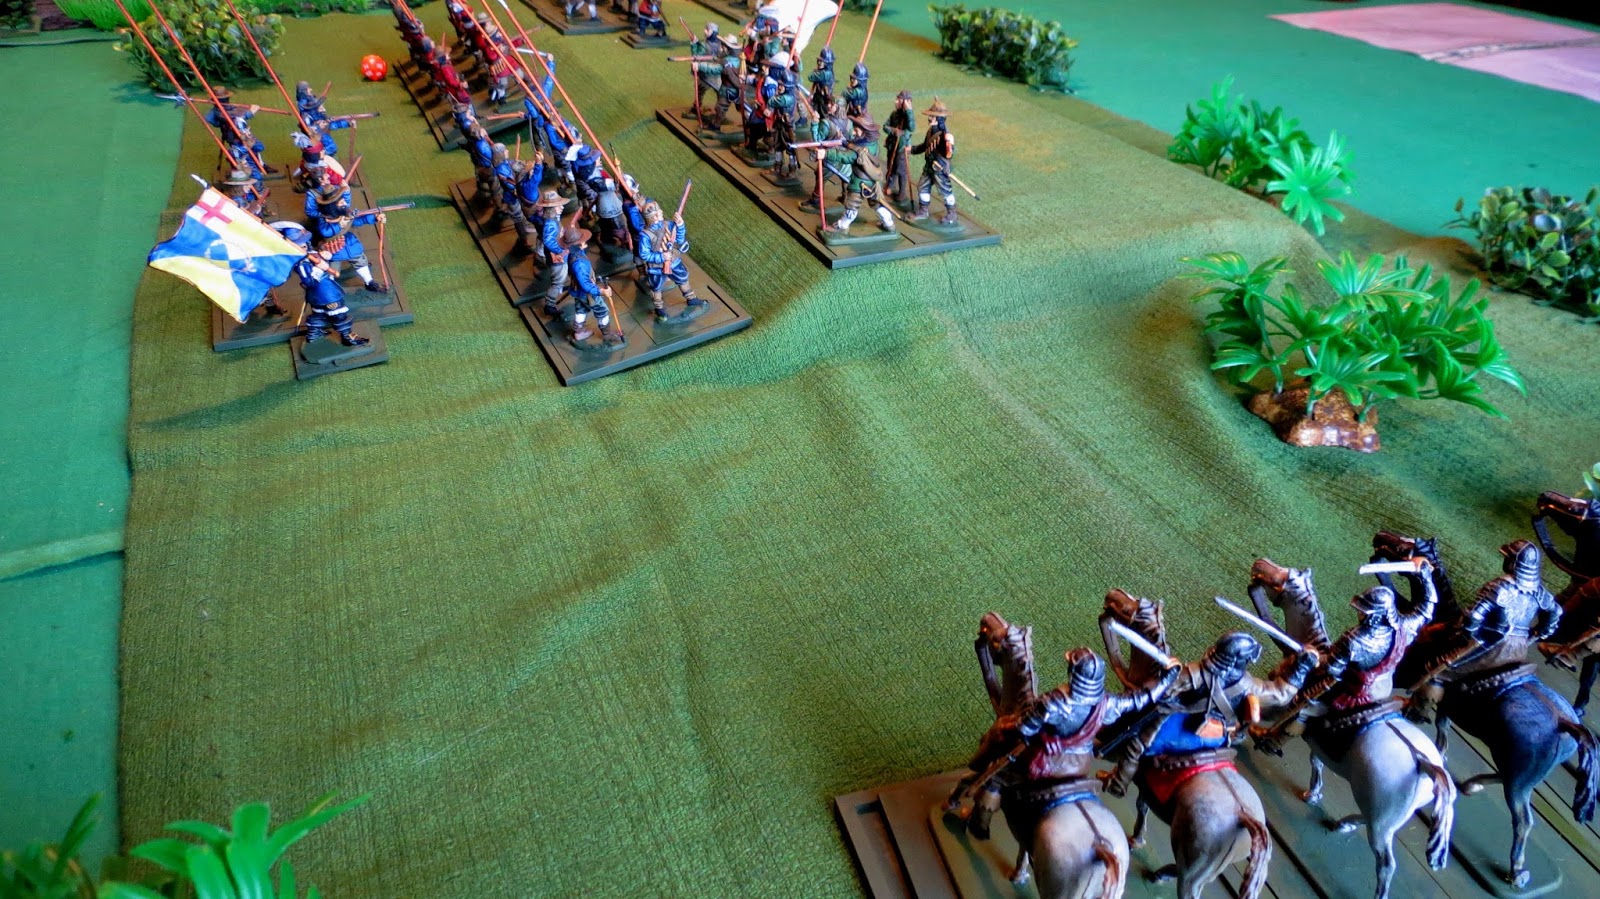
The Saxon host cross the river at the ford, cavalry in hot pursuit, followed by fleet footed skirmishers and finally the mass of infantry.

So the basic game is very quick and easy to master, but what intrigues us is testing out the effects of those subtle changes to see how well they reflect the chosen period.  In this case we found the unit movements were much more fluid and less formal than in the medieval period, also the skirmishers of these Dark Ages were much less effective than the bowmen of the later period.  But the most notable difference was the resilience of the infantry formed up in a shieldwall, which was very hard to crack.

The Viking shieldwall braces itself for the impact of the Saxon cavalry, but holds without difficulty. The supporting infantry, following close behind, are forced into a bottleneck created by the ford and don't have enough room to manoeuvre around the melee.  Looks like I didn't think this move through  very well!

The Viking shieldwall has finally broken, but the Saxons have lost their cavalry and time is running out to prevent the raiders escaping, the Saxons surge forward and easily brush aside a unit of skirmishers.

The Saxons form sheildwall and face the remaining Vikings, they realise that the main body of raiders are clean away with the plunder, and that they will be advancing uphill fighting at a disadvantage...........so they decide to pack up and go home for tea.

These plastic Expeditionary Force figures are described as 40mm but they are clearly bigger than that, we compared them against my 40mm Elastolin Vikings and they towered over them (should have taken a pic for comparison, sorry about that!).  They come factory painted in the neat flat style you see here, personally I would give them a wash of brown stain (which is what Elastolin used to do) to give them a bit more definition, but they're not my toys so that won't be happening.

Anthony has mounted them on circles of MDF which provides greater stability on the table and also give them more of an "Old school" look.  This is the full range here; cavalry, infantry and archers for both Vikings and Saxon, that's the full extent of the range, shame they didn't extend to Normans but as Expeditionary Force have now moved upscale to 54/60mm figures this may be all we'll ever see from them in this size.

These were the first range issued by Expeditionary Force and were aimed at wargamers, the sculpting is excellent and while the plastic weapons look rather fragile they are in fact very robust.  Just wish we could find some other ranges (plastic or metal) that would compliment them, A Call to Arms Normans are a little too large, while the old Kellogs/Rubinstein "Warriors of the World" figures are about the right size but they are limited to just one Viking and one Norman.  Ho Hum.

Monday 4 June 2018

OHW Smolensk in 54mm

At the weekend Anthony and I got together for our fourth game using the One Hour Wargame rules. Flushed with the success of our Napoleonic game we felt ready to take the next step and devise our own scenario, I chose to base it on the First Battle of Smolensk in July 1941.  We aren't sticklers for accuracy but do want the thing to feel right so the Germans had to be light, fast, hard hitting and cohesive while the Russians would be steady, solid, and hard hitting but uncoordinated. It's been a long time since I've played a  WW2 wargame with 54mm toy soldiers, here's how it turned out:

The German motorised units deploy to force a bridgehead across the river Dneiper. A reconnaissance unit dashes across the bridge, supported by elite assault troops, heavy and light tanks, antitank, mortar and two infantry units. A total of eight units, see note at end of post for further explanation about troop types.

The Russian defenders lie in wait; on the left, infantry in the woods backed by a unit of heavies, blocking the road to the bridge is an antitank gun, behind it KV1 and KV2 tanks are hull down on the hill, behind them the Guards division is held in reserve and the mortars await firing instructions. On the right two more units of infantry and two of navy have take up position in the woods and ruins of the city's suburbs. A total of 12 units.

A very strong position with defence in depth, the winner will be whoever holds the hill (where the tanks are stationed) after 15 turns.  In the actual battle the Russian forces put up a strong fight with fierce counterattacks but a weak command structure meant that they were poorly coordinated, to represent this we used the Shambolic Command rule (see here) so that the Russian Commander could only move or fire up to four units each turn.

The bridge is a vintage tinplate railway piece made in Germany by Gebr. Bing (Bing Brothers) around 1900, these usually sell for about £60 but this was in such poor condition I got it for £1 (about 20 years ago) I finally got around to stripping and repainting it for this game (there's nothing like a deadline to get things done). I painted it as a road bridge because the rail gauge is too large to go with the British made Triang railway tracks that I have.  The wooden western town buildings represent a peasant village or dacha (or something like that)

The badly mauled reconnaissance unit veers off the road to make way for the Pzw II and Stug following in support.

The Pzw II is a vintage piece made in Germany during the 1930's by GAMA, I thought it looked right at home in this setting.

The infantry have effected a river crossing by boats, just as they did at Smolensk in 1941, to represent this each unit must first advance to the river bank then next turn it can dice to activate the crossing by achieving 6+ from a throw of 2xD6, if it fails it remains where it is. Needless to say, only infantry on foot can cross like this, vehicles must use the bridge.

Units can move or fire in each turn but not both, apart from the mortars they all have a firing range of  2 feet.  The mortars have a range of 8 feet but needs a friendly unit to spot for them, the spotter needs to be within 2 feet of the target and have clear field of sight to them.

The two Russian naval units occupied the suburbs of the city, here represented by Airfix Strongpoint buildings which have been enhanced with fallen rubble and collapsed rafters.

Heroes of the Soviet Navy scramble through the ruins. The individual figures are mounted on metal bases which enables them to stand on uneven or sloping surfaces and prevents the tumbling domino effect. To make two distinct units I painted all the riflemen as white jackets, so they could also double as WW1 Russian/German sailors, the figures with automatic weapons became blue jackets so can only be used for WW2 and later.

Out of shot, at the far end across the river the Russian partisans have finally attacked the German mortar unit but are more of a distraction than a threat and are seen off without difficulty. The use of partisans is another special rule which we devised for our last Napoleonic game (see here) they can appear from any piece of cover or any table edge at any time subject to being activated by a throw of 6+ on 2xD6 - a very simple but effective game mechanism.

The German force has taken the bridge and cleared the surrounding woods but they are now too depleted to withstand the inevitable counterattack. 

The Russian heavies move in for the kill as they retake the hill and woods around the bridge.  In hindsight I think I gave the Russians too much cover, even with just four units firing each turn they were able to pick off the Germans quite leisurely. Also I made a tactical error in trying to punch through with the armour from the start, I should have infiltrated infantry across the river one unit at a time to spot for the mortars and soften up the defences before releasing the tanks. Ho hum!

The Russian mortars, these truly are the kings of the battlefield.

In 1941 the Germans forced the crossing and held the bridgehead against repeated counterattacks but the Russians retreated due to the threat of being cut off in a pocket by other German armies advancing to the north and south of them. I could have replicated the effect of this by requiring the Russian commander to make a graduated withdrawal but I didn't think of that at the time.  We play and we learn.

We both felt that the game worked visually but wasn't as satisfying as the previous Napoleonic game, it was just a bridge too far!

A note on the use of unit types.

This post assumes some knowledge of the One Hour Wargames rules that we use, these are very easy to assimilate and are designed to give fast play games for players who are short of time and space.  For each historical period both sides are allowed up to 6 combat units, which must fall into one of four different unit types, so for WW2 games the rules provide for infantry, mortars, antitank and tanks.  

This can be rather limiting if you hanker after a larger scale game and as we are not short of time or space we have expanded on the concept by increasing the number of units used and bringing in troop types from other historical periods, i.e. the machine age (WW1) rules provide for heavy units - slow moving but hard hitting and cavalry - very mobile but with reduced fire effect (which we used for the German reconnaissance unit). Other troop types were brought in from earlier periods; the Russian Guards and German Assault units used the zouave profile - elite units that move faster and hit harder, while the Russian Partizans use the skirmisher profile - light troops, very mobile but with reduced fire effect. 

Monday 2 April 2018

Double Delay!

Double Delay is the name of scenario no. 9 in One Hour Wargames, written by Neil Thomas, and it's the game that Anthony and I chose to play this weekend. In light of our previous experience using OHW we decided to use the full 6'x10' table, nine units per side instead of six and five troop types instead of four. We diced as normal for units to get a mix of infantry, cavalry, artillery and skirmishers then switched one unit of infantry for Guards (who use the Zouave profile from the ACW section of the book)

The British have occupied the town of San Antonio somewhere in the Peninsula, they are preparing to leave and rejoin the main army when the French appear on the horizon.  They must delay the enemy and, if possible, deny them the town.

My poor old mother, God rest her soul, would have had forty fits if she'd seen what I've done to her finest Irish linen sheets.  After several days of sponging and stippling they started to look like barren scrubland.

I was still painting the rocks at eight o'clock on the morning of the game, and they were still a bit wet when we were setting up!  There's nothing like a deadline to get your productivity racing.

In true Wellsian fashion the toy soldiers all huddle behind hard cover to shelter from the enemy guns.  They needn't have bothered, although the guns have a range covering virtually the whole table, their limited casualty effect means that troops in the open can take a hard pounding for some time before their capability becomes too seriously depleted.  This is a good thing, it stops the guns dominating the game and reflects the effect of roundshot.

To add a bit of spice the British contingent included a band of Spanish Guerrillas (using the skirmisher unit profile) who act independently and can appear from any piece of cover or enter from any edge of the table at any time subject to the British player achieving an activation score of 6+ on a throw of 2xD6.  Thus there's a good probability they'll appear on cue but it can't be taken for granted, here they emerge from the rocks to give the French artillery a nasty shock!

I take any opportunity to get this old Spanish town out for a game, I bought it for £10 at the very first Plastic Warrior Show, (read about it here) I didn't really want it but it was destined to go in a skip if I hadn't taken it, also it had featured in Donald Featherstone's book "Skirmish Wargaming" (page 50) so I felt I had to save it.

French skirmishers scale the heights on the left of the field supported by the Guards and Chasseurs a Cheval, forcing the British artillery to retire.

The larger table size and additional units made for a lively game with lots of manoeuvre and three actions playing out: forcing the bridge on the left, the main assault against the town on the right and a fight to suppress the guerrillas in the rear centre.  The poor marksmanship of the Guerrillas caused few problems for the French gunners but to contain them tied down an inordinate number of French infantry that could have been put to better use elsewhere, such is the purpose of these irregulars.

The river is a sectional model that clips together, made by Pegasus, it arrived in the nick of time the day before the game and went straight from box to table.

The French eventually took the town and pursued the British off the table, as the scenario required, we played the full 15 moves in about two and a half hours.  I think we have found a formula that makes the OHW system work well for 54mm toy soldiers.

Sunday 18 February 2018

Fighting Retreat

Last weekend our stalwart wargaming friend, Anthony, called over to test out another scenario from One Hour Wargames (OHW) by Neil Thomas. This time dice were thrown to select the scenario and fate handed us Fighting Retreat, myself on the run with two units of knights, one of men at arms and one of archers, while Anthony took up the chase with four units of knights, one of archers and a hotch potch of the levy.
Here's how the action panned out:

The opening moves see the renegades cross the river, do they make a stand and hold the two fords or run for the hills?  My natural instinct was to pull the archers back into the treeline where they would be safe from the thundering hooves of the knights, I'm sure this is what they would have done in reality but the rules don't allow any units into the woods. With these medieval rules, archers in woods would be nigh on unassailable so we went with the premise that if the footmen reached the safety of the woods they would just disperse and melt away into the undergrowth.

The archers got off one volley before the horsemen were upon them, the outcome was never in any doubt but the footmen were now playing for time and held out rather longer than one might reasonably have expected.

I couldn't think what toys to use for the levy (in the right foreground) so I quickly cobbled together some odds and ends of Robin Hood figures. I really don't like putting unpainted figures on the table and was doubly annoyed after the game to remember my Elastolin swappet Saxons which would have been perfect for this role, drat!

The archers succumb to the onslaught from the pursuing knights and their own horsemen, waiting in support, finally pile in to hold the line at the ford.

It was much the same story at the second ford, where the men at arms held off their attackers until being ridden down and eventually reinforced by their own body of knights.

And that was about it, the renegades held out until about round 12 before being eliminated, leaving the pursuers to ride on and capture the objective by round 15, thus winning the game.

There's a lot I like about OHW, primarily the simplicity, easy to learn, quick to set up and play, needing little space and few figures. But after two games it's feeling a bit limited to me, I feel a larger area and more units are needed to give more flexibility, as it stands there isn't much room for manoeuvre and units in melee can't disengage until one is eliminated so it's all too easy for a game to end up as one long slugfest (or perhaps I'm just a crap General?).  

Where we see this going is to continue using the core game system but use the whole 10' x 6' table area (as opposed to 6'x6') increase the max number of units from six to ten, increase troops types from 4 to 5/6 and set out terrain based on sections of historic battlefields.  Will these alterations change the dynamic of the game? What do you think?